 Dec 13 / 2023
Table of Contents
- Introduction
- Understanding How Schema Markup Works
- Schema Formats Supported by Google
- JSON-LD (JavaScript Object Notation for Linked Data)
- Microdata
- RDFa (Resource Description Framework in Attributes)
- Step-by-Step Guide for Creating Schema Markup
- Conclusion
Introduction
Remember Schema Markup from our last blog? Well, buckle up because we’re about to make it super practical! This time, we’re exploring how Schema works on Google, talking about the supported formats Google loves, and I’ll walk you through adding Schema Markup to your site step by step. Think of it as giving your website a special language that Google understands better, making it more visible and user-friendly. Stick with us to make your website shine online and provide an awesome experience for your visitors!”
Understanding How Schema Markup Works
At its core, schema markup is the key to communicating with search engines in a language they understand. It goes beyond the surface content, providing a deeper understanding of the context and meaning of your data. In simpler terms, schema markup acts as a translator, helping search engines grasp the nuances of your content.
Structured data markup is the backbone of this process, allowing you to highlight specific information on your webpage. By adding snippets of code to your HTML, you guide search engines to interpret and display your content more effectively.
Schema Formats Supported by Google
Google, being the dominant player in the search engine arena, supports various schema formats. The three primary formats include JSON-LD, Microdata, and RDFa. Each format has its strengths and use cases.
JSON-LD (JavaScript Object Notation for Linked Data):
This format, often considered the most straightforward, involves placing the script directly into the HTML of your page. Its simplicity and compatibility with JavaScript make it a popular choice.
Example of JSON-LD Schema
<script type=”application/ld+json”>{
“@context”: “http://schema.org/”,
“@type”: “Organization”,
“name”: “LBN Tech Solutions”,
“url”: “https://lbntechsolutions.com”,
“image”: “https://lbntechsolutions.com/img/logo.png”
}</script>
Microdata:
Embedded directly into the HTML, Microdata is known for its ease of use. It involves adding specific HTML tags to indicate the type of content, making it readable for both humans and machines.
Example of Microdata Schema
<span itemscope itemtype=”http://schema.org/Organization”>
<meta itemprop=”name” content=”LBN Tech Solutions”/>
<link itemprop=”url” href=”https://lbntechsolutions.com/”/>
<img itemprop=”logo” src=”https://lbntechsolutions.com/img/logo.png”/>
</span>
RDFa (Resource Description Framework in Attributes):
Utilizing HTML tag attributes, RDFa integrates metadata directly into the HTML content. It offers flexibility and precision, allowing you to mark up specific elements on your page.
Example of RDFa Schema
<div vocab=”https://schema.org/” typeof=”Organization”>
<span property=”name”>LBN Tech Solutions</span>
Contact Details:
<div property=”address” typeof=”PostalAddress”>
Main address:
<span property=”streetAddress”>Old# 67, New# 36, 3rd Street, D Block Anna Nagar East</span>
<span property=”postalCode”>600102</span>
<span property=”addressLocality”>Chennai</span>,
</div>
Tel:<span property=”telephone”>9962744118 </span>,
E-mail: <span property=”email”>info@lbntechsolutions.com</span>
</div>
JSON-LD is often recommended for its simplicity and ease of implementation. It separates the data from the HTML, making it cleaner and less prone to errors. It’s also more compatible with modern web development practices.
Also Read: Schema Mark-up in SEO
How to Add Structured Markup Data to Your Site
Now, let’s roll up our sleeves and delve into the practical aspect of implementing structured data on your website. Follow this step-by-step guide to ensure a seamless integration:
Step-by-Step Guide for Creating Schema Markup
Step 1: Visit Google’s Structured Data Markup Helper tool:
- Go to Google’s Structured Data Markup Helper.
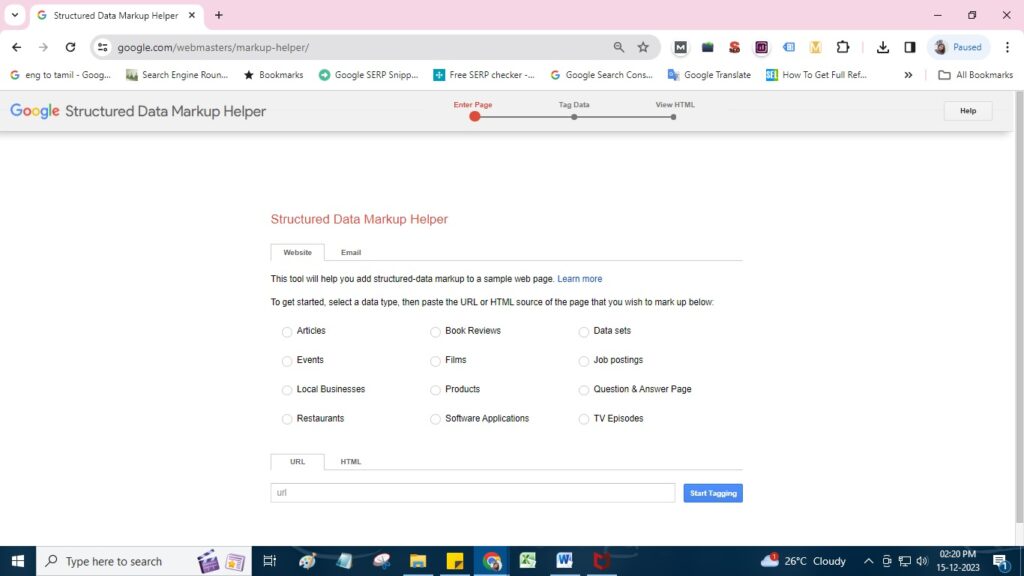
Step 2: Choose the Data Type:
- Select the data type that matches your content. If it’s a blog, opt for “Article.”
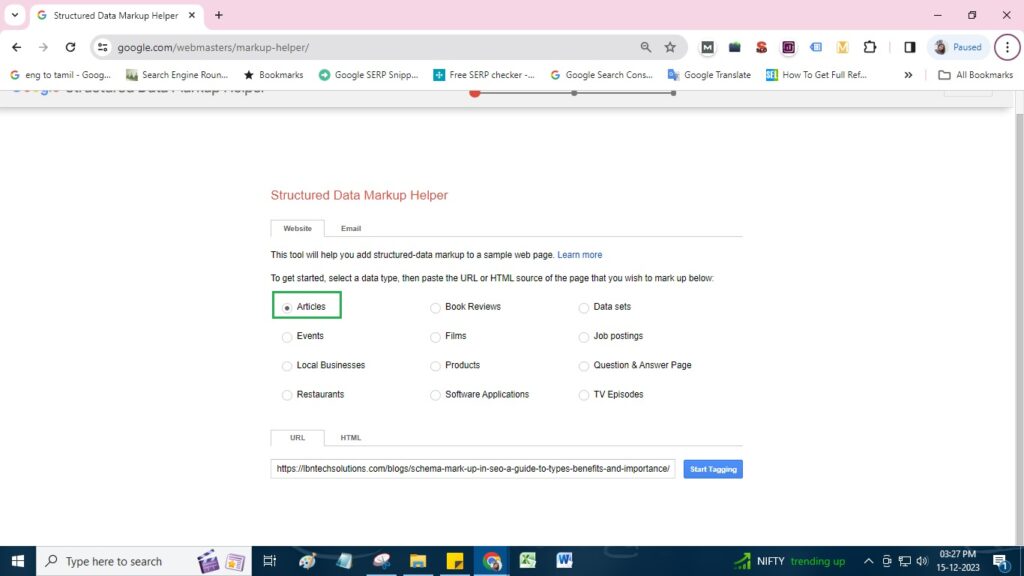
Step 3: Paste Your Blog URL:
- Insert your blog URL or HTML code, and then click “Start Tagging.”
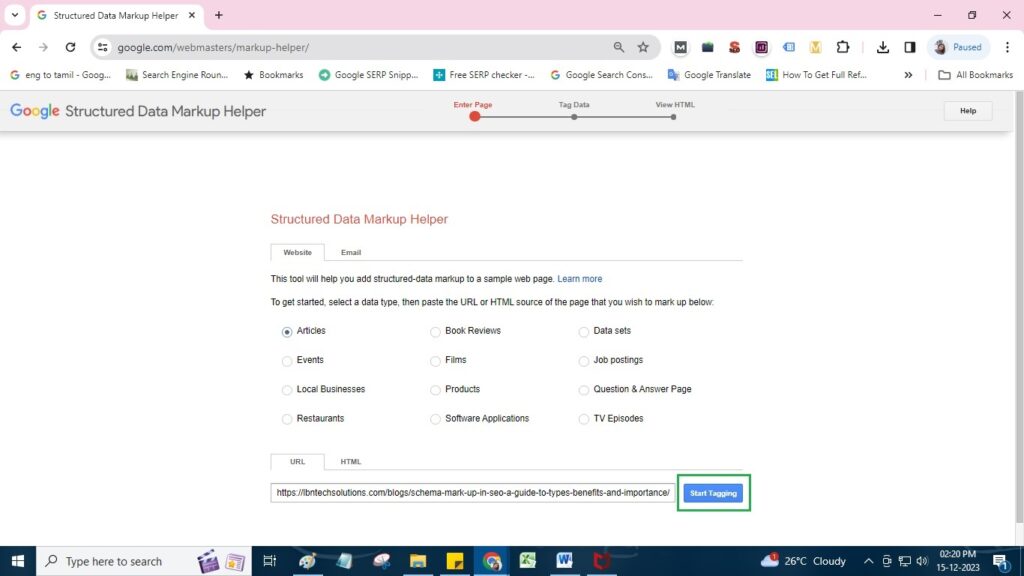
Step 4: Start Marking Up Your Blog:
- Highlight and tag elements like the Name. For missing items, use the “Add missing tags” option.
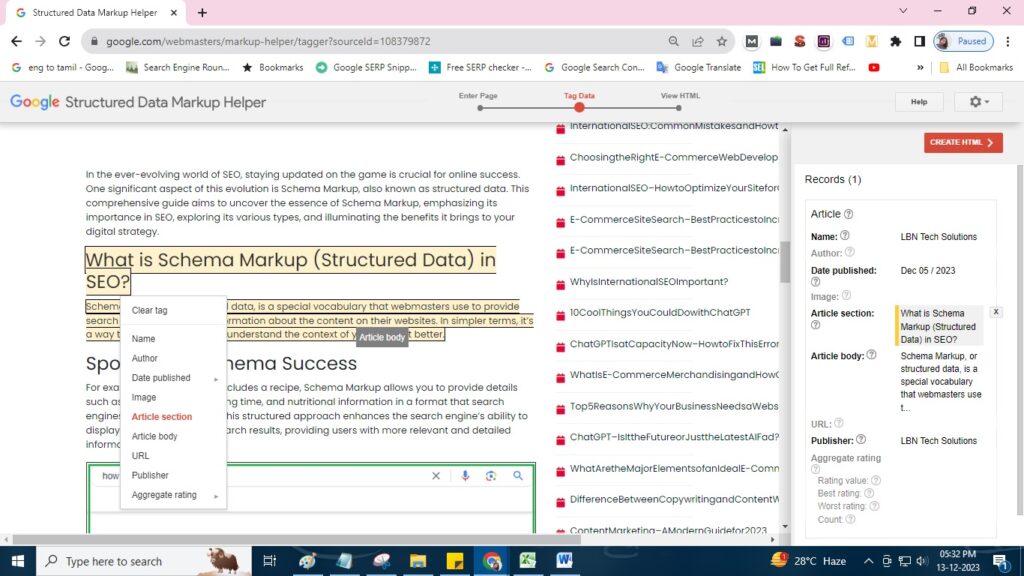
Step 5: Generate HTML:
- Click “Create HTML” to get the code. Choose between JSON-LD or microdata.
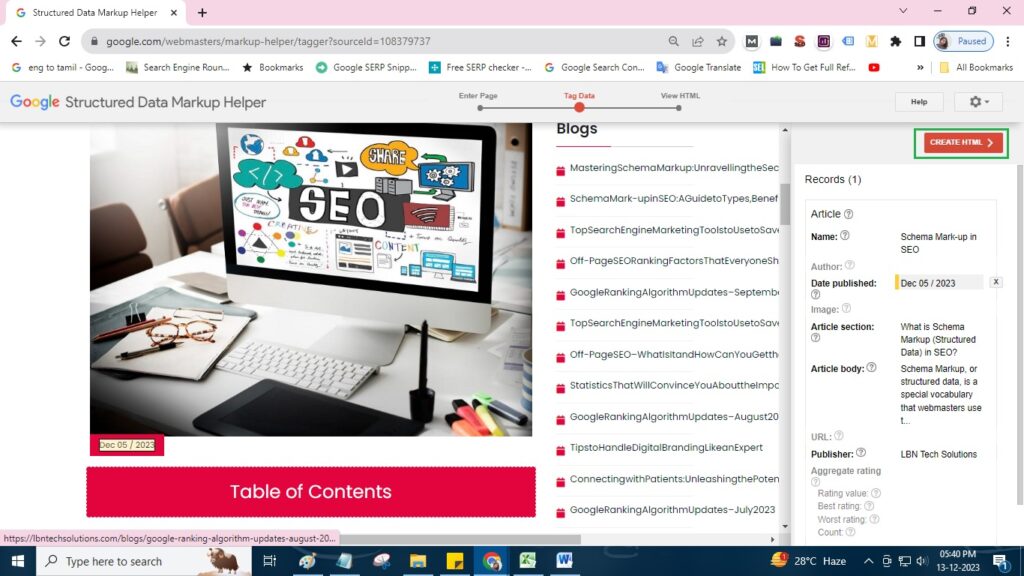
Step 6: Add Markup to Your Blog:
- Copy the code and paste it into your blog’s content management system (CMS). You can directly paste it or upload the HTML file.
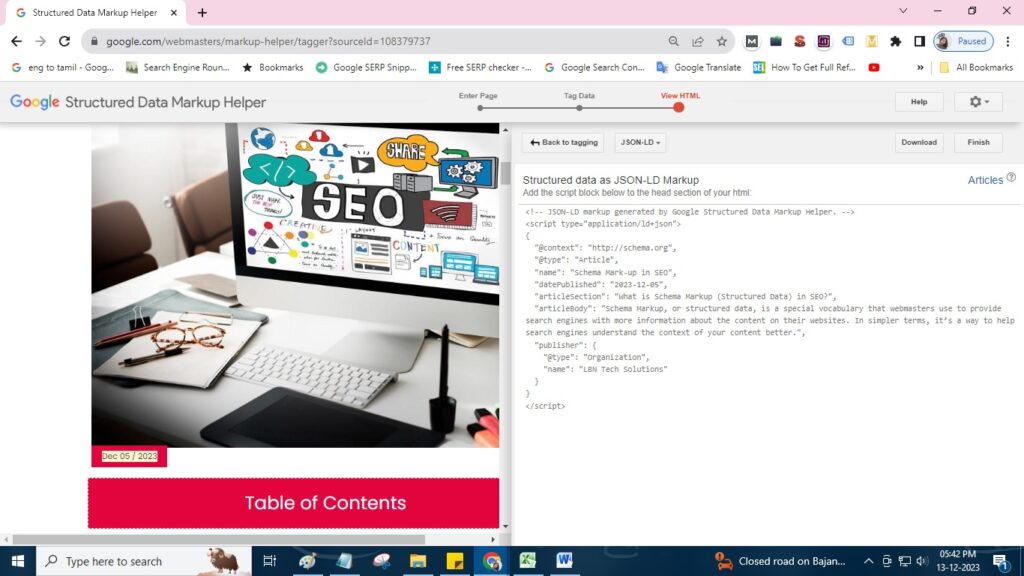
Step 7: Test Your Structured Data:
- Use Google’s Rich Results Test tool to check for correctness. Enter your blog’s URL or code snippet to identify any errors.
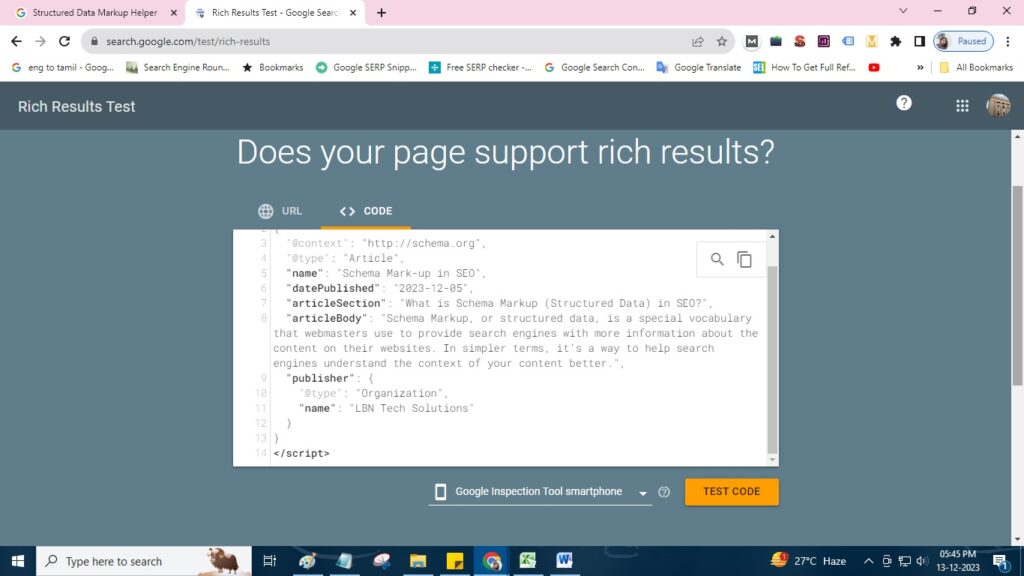
Step 8: Fix Errors if Needed:
- If errors are detected, edit the code on the left side and click “Run test” to revalidate.
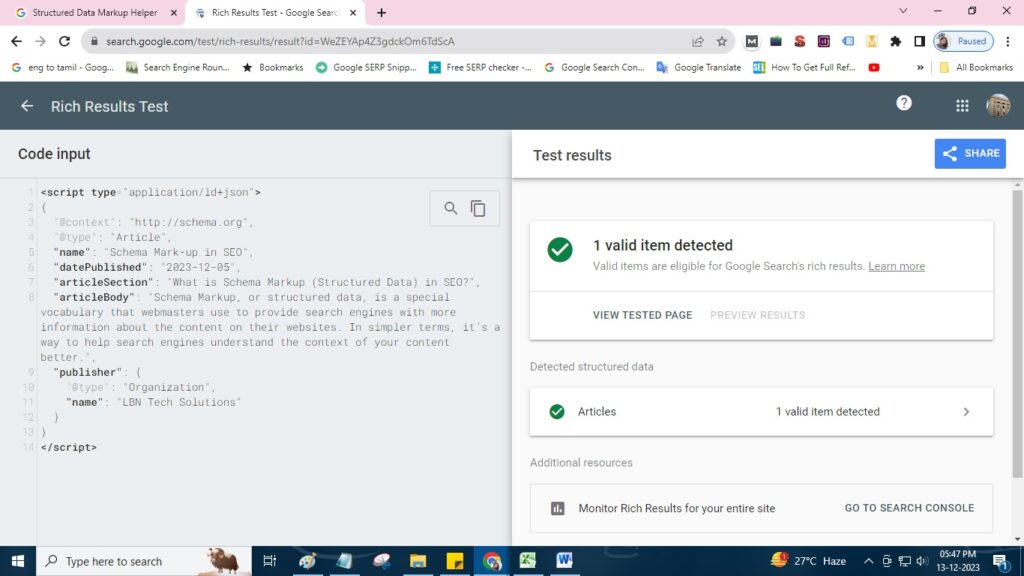
Following these steps in order will help search engines better understand your blog’s content, potentially improving its visibility in search results.
Conclusion
Mastering schema markup is a crucial aspect of optimizing your website for search engines. By understanding how structured data works, exploring Google-supported schema formats, and implementing a step-by-step procedure, you unlock the potential to stand out in search results. Embrace the power of schema markup to communicate with search engines effectively and elevate your online presence.
Read our Other Blogs
- The Importance of UI/UX Design in Web Development
- The Ultimate Guide to Content Repurposing – The Underrated SEO Factor
- 7 Actionable On-Page SEO Factors You Need to Know
- What Are the Phases Involved in Web Development?
- Cracking the Code: Mastering On-Page SEO for Website Excellence
- A Beginner’s Guide to Web Development
- Google Algorithm Updates – March 2024
- Top 5 CMS Platforms for Website Redesign and Blogging – Part 2
- 10 Telltale Signs Your Website Needs Redesigning
- How to Track Website Calls and Email Clicks in GA4 Using Google Tag Manager
- Google Ranking Algorithm Updates – February 2024
- Website Redesign Mistakes Businesses Should Avoid
- How to Set Up Google Tag Manager: A Step-by-Step Guide
- What is Google Tag Manager? How does it work and what are the Benefits of using Google Tag Manager?
- Top 5 CMS Platforms for Website Design and Blogging
- What Is CMS and How Can It Be Used in Website Development?
- Why Should You Consider Redesigning Your Website?
- How to Create a Demand Generation Campaign in Google Ads
- The Ultimate Guide to Profile Page Structured Data
- A Guide to Schema Markup Types
- Demystifying Demand Gen Ads: Understanding the Power of Awareness and Engagement
- Mastering Schema Markup: Unravelling the Secrets of Schema, Supported Formats, and Implementation
- Off-Page SEO – Best Short-Term and Long-Term Strategies to Employ
- Schema Mark-up in SEO: A Guide to Types, Benefits, and Importance
- Why Is Search Engine Marketing Important?
- Top Search Engine Marketing Tools to Use to Save Time and Money – Part 2
- Off-Page SEO Ranking Factors That Everyone Should Know About
- Google Ranking Algorithm Updates – September & October 2023
- Top Search Engine Marketing Tools to Use to Save Money and Time – Part 1
- Off-Page SEO – What Is It and How Can You Get the Best Out of It?
- Statistics That Will Convince You About the Importance of Medical Content Marketing
- Google Ranking Algorithm Updates – August 2023
- Tips to Handle Digital Branding Like an Expert
- Connecting with Patients: Unleashing the Potential of Medical Content Marketing
- Google Ranking Algorithm Updates – July 2023
- WhatsApp Ads Decoded: Everything You Must Know About This Marketing Game Changer
- Digital Marketing vs. Digital Branding – What’s the Difference?
- Website vs. Social Media: Is a Website Still Necessary for a Business?
- Google Ranking Algorithm Updates – June 2023
- Google Ranking Algorithm Updates – May 2023
- International SEO: Common Mistakes and How to Avoid Them for Global Success
- Choosing the Right E-Commerce Web Development Company: A Comprehensive Guide
- International SEO – How to Optimize Your Site for Other Countries?
- E-Commerce Site Search – Best Practices to Increase Conversion (Part – 2)
- E-Commerce Site Search – Best Practices to Increase Conversion (Part – 1)
- Why Is International SEO Important?
- 10 Cool Things You Could Do with ChatGPT
- ChatGPT Is at Capacity Now – How to Fix This Error?
- What Is E-Commerce Merchandising and How Can It Help Improve Sales?
- Top 5 Reasons Why Your Business Needs a Website in 2023
- ChatGPT – Is It the Future or Just the Latest AI Fad?
- What Are the Major Elements of an Ideal E-Commerce Website?
- Difference Between Copywriting and Content Writing
- Content Marketing – A Modern Guide for 2023
- How Does an Ecommerce Website Work?
- 7 Reasons Why Having an Ecommerce Website Is More Important Than Ever
- How Does Video Content Help Improve SEO?
- 5 Mobile Marketing Techniques That Can Grow Your Business
- Lead Generation Basics for Small Business Owners
- Brand Loyalty – Why Does It Matter and How to Build It?
- What Is the Difference Between Content Marketing and Content Strategy?
- 5 Ways Technology Might Be Blocking Your Business Progress
- Top 5 SEO Mistakes to Avoid
- Trends That May Shape the Future of Digital Marketing
- The History of Healthcare Marketing
- 5 Ways to Convert Your Visitors into Customers
- Top 5 Reasons Why Your Website Needs a Blog Corner
- 5 Loyalty-Building Techniques for Healthcare Marketing
- How Do Healthcare Companies Benefit from Content Marketing?
- Types of Healthcare Content That Can Increase Patient Volume
- How to Conduct a Competitive Analysis?
- How to start a digital marketing agency from scratch and run it successfully? | Part 2
- How to start a digital marketing agency from scratch and run it successfully? | Part 1
- What Is the Difference Between Google My Business and Google Business Profile?
- Game Plan for a Successful Healthcare Content Marketing Strategy
- What to Expect from a Professional SEO Company?
- Rules for Healthcare Content Marketing
- How to Create Unique Content That Works for the Healthcare Industry?
- 10 Innovative Ways to Market a Healthcare Brand
- The Role of Digital Marketing in the Healthcare Industry
- What is the Role of SEO in the Web Design/Development Process?
- What is the Process of Web Design and How Does It Differ from DIY Solutions?
- What are the Newest Trends in Website Design?
- A Complete Guide on Google Business Profile (GBP)
- How to Write Compelling Headlines in 3 Steps
- The Significance of Meta Description in 2024
- How to Write a Product Description for eCommerce Websites
- Digital marketing tips for preschool owners
- What are the 9 basic rules Google follows for Featured Snippets?
- What are brand pillars, and why do they matter?
- What should small businesses post on social media (a complete guide)?
- Is Trying To Rank SEO without an SSL (HTTPS) Pointless?
- What is agile marketing?
- How will Core Web Vitals enhance SEO in 2024?
- How to Get the Results You Want through Your Digital Marketing Plan?
- Demystifying the Debate Around Influencer Marketing (How to Do It Correctly)
- How We Brought Down the Bounce Rate from 93% to 5% (Case Study)
- Google Ads Checklist for 2024
- Job opportunities in Digital Marketing
- Reasons Why Google May Penalize Your Website
- Difference between Organic and Paid Search Results
- The Importance & Effectiveness of Monthly Newsletters
- How to Rank Higher on Voice Searches
- The making of the first ever Digital Women Economic Forum
- How to Use Customer Service as an Online Marketing Strategy
- 5 Beginner Mistakes Most Small Businesses Make in SEO
- The Importance of Commenting in Forums for SEO
- The Importance of Customer Engagement in Social Media Management
- How to Market using Social Media for Different Generations
- Top 10 Interview Questions and Answers to Hire a Digital Marketing Executive
- Digital Marketing Trends for 2024
- Update your Address or be prepared to lose Business